Thursday, 22 October 2015

Nasi Kuning (Indonesian Yellow/Turmeric Rice)


Nasi kuning literally translates to 'yellow rice'.

This dish originated from the Java island in Indonesia.

The rice is cooked in coconut milk and a variety of spices and aromatics.  And one of the spices used is turmeric, which is what gives this rice dish its beautiful yellow colour!

You would normally find nasi kuning served in a cone shape along with a large selection of side dishes in special events, such as birthday parties and opening ceremonies, as it symbolises good fortune and wealth.

To make nasi kuning, you would traditionally soak the uncooked rice in all of the spices overnight! You would then cook it in a big pot until the rice fully absorbs all of the coconut milk and water.

But today, I am going to show you how to make this in my trustee rice cooker!  This will only take 15 to 20 minutes.  So much less time and effort but still maximum flavour!

You are going to need:
  • 2 Kaffir Lime Leaves
  • 2 Bay Leaves
  • 1 Stalk of Lemongrass (white part only, bashed and cut into thirds)
  • 50 gr Coconut Cream Powder
  • 2 tsp Turmeric Powder 
  • 1 tsp Galangal Powder
  • 1 tsp of Salt
  • 650 gr Uncooked White Rice
  • 1,080 gr Cold Water
Method:
  1. Wash the rice, drain well and place it into your rice cooker insert.
  2. Add the water, coconut cream powder, turmeric, galangal and give it a thorough mix.
  3. Then add your salt, kaffir lime leaves, bay leaves and lemon grass.  Give it a good final mix.
  4. Cook it in the rice cooker.
  5. Once cooked, leave the rice cooker on and do not open the lid for 5 minutes.  This will ensure all of the liquid gets absorbed by the rice.
  6. After 5 minutes, open the lid and fluff up the rice.  
  7. Serve the rice along with other side dishes.


Tuesday, 22 September 2015

Succulents and Cactus Terrarium


milkandhoneyblog


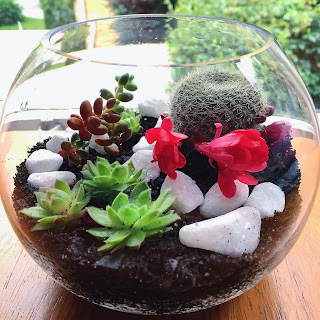
These terrariums are so pretty and will definitely brighten up any room.  They will also make a nice centre piece too on the dining or coffee table.

I've often spotted them in weekend markets here in Sydney, as they are becoming a trend in recent years, but they cost a fortune! Since there are literally hundreds of tutorials on Pinterest and YouTube, I wanted to make my own.

Off I went to the craft and party supplies shops near work!  Bought my round glass bowl and got my pebbles.  I just needed to find some nice plants.

I've always gone to Bunnings to get my gardening supplies but the cactus and/or succulents that they have all look pretty much the same.  You want a nice variety and some colour for your terrariums.   I want those nice ones like they use in the tutorials (most of which by the way are by the Americans).

I had also seen little pots of cactus and succulents sold in the market, but they would cost me $12 for one tiny succulent!  I had of course thought of ordering them online, but after looking at how much it would cost me for the postage, I decided this terrarium project will need to be on hold for now.

Fast forward a few months to last weekend, lo and behold.. I found some beautiful cactus and succulents! Yes!!

My brother-in-law and I share the same passion (or as my sister would put it: 'unhealthy obsession') for cooking and gardening.  I was showing him these gardening videos on YouTube and said to him that I want to start planting blueberries since it is now Spring.  Then I went on how I've never been able to find it anywhere but I know some place that might have it.  He was so inspired by the gardening videos that I made him watch and right there and then he declared that he would start his own balcony garden! Anyway, long story short, this place of hope (for my blueberries dreams) was Flower Power!  So came Saturday, off we went to Flower Power!

We love Flower Power!  And no, I am not being endorsed.

The moment we got there, we just got so excited seeing all these glorious plants!  All these flowers, fruit trees, herbs and of course, succulents! and cactus! A variety of them!! Yes!

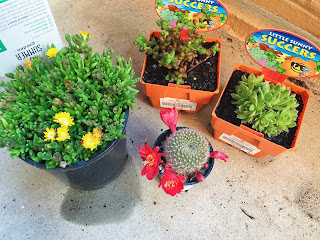
Here are the plants that I got:

milkandhoneyblog
Cactus and Succulents


The labels attached to the containers do not say what varieties they are.  They might have said what each of these are at the shop, but I was too psyched and too busy running around like a fat kid in a candy shop to notice.

milkandhoneyblog
Blueberry

I decided to create my very first terrariums this morning before I went for work.  I woke up 30 minutes earlier and the fact that I managed to do two terrariums and still be at work early shows how simple it is to do!   I did not get to take pictures of each of the steps though.  But I am planning on doing another one for a gift.  When I have the chance to pick up more plants sometimes soon, I will definitely be taking more pictures and perhaps do a tutorial video on it too.

milkandhoneyblog
Cactus and Succulents Terrarium

I suppose the hardest thing about this project is deciding on the design.  I didn't really have any specific design in my head yet when I bought my plants and even when I started doing it.  I just sort of improvised as I went.  I would start with the shorter plants first, then some of the pebbles and worked my way around the bowl with the taller plants, changing things around if I didn't like the look of it.  I was happy with the end result.

milkandhoneyblog
Cactus and Succulents Terrarium

milkandhoneyblog


The other thing that is quite difficult to do, especially if your terrarium bowl is on the smaller side, is adding more soil without getting them all over your succulents.  Then trying to clean it off the plants with your fingers but ended up breaking one of the leaves.  I didn't have one with me, but it would be very handy to have a small brush to clean the surface of your pebbles and plants.


milkandhoneyblog
Cactus and Succulents Terrarium

These terrariums are very low maintenance, which is always a bonus!  If you are keeping them in a spot with lots of sun lights, you will need to water them probably once a week.  But if you are keeping them indoors with not much sunlight, you can get away with watering only once every fortnight.  Note that this will depend on the varieties you get and always make sure to read the labels attached to the containers.  Mine says that they love direct sunlight and need to be watered once a week.

milkandhoneyblog
Cactus and Succulents Terrarium

There are a lot of tutorials out there that say you need to put a layer of pebbles and rocks on bottom of your glass bowl before dumping in the soil to allow for extra drainage.  However, the video tutorials from Garden Answers on YouTube say that you do not want to do that, as this will cause the water to pool on the bottom of the bowl and cause the roots to rot.  Adding pebbles on the bottom of the bowl also means that you are decreasing the depth of your soil, which equals less space for your plants to develop their roots.  This makes sense so I decided to leave the bottom layer of pebbles out!

I will be giving you updates in a few weeks time on how our terrariums are going!

To make these terrarium, you will need:

  • Glass Containers - size and shape of your choice
  • Potting mix for Cactus
  • Succulents and Cactus plants
  • Decorative Pebbles
  • Coloured Sands (optional)
  • Small teaspoon
  • Small brush
Here is how:

  1. Wash your glass containers and pebbles with warm soapy water and dry.
  2. Pour your cactus potting mix into the soil. Pack lightly to firm down the soil.  This makes it easier to keep soil off your pebbles and plants.
  3. Take your plants out of their original plastic containers and separate into individual plant. Clean the soil off the roots and trim the roots to about 1 cm, you can use the scissors to do the trimming.
  4. Using the other end of you spoon, poke a hole in the soil in the glass container, and plant your succulents and cactus.  I started with the shorter succulents first, then work my way around the bowl with the taller ones.  I then add the pebbles to fill the empty spaces around the container. You can use coloured sands too if you wish.
  5. Using your brush, clean soil off the surface your plants and pebbles if any.
  6. Using your teaspoon, water the plants.  The teaspoon makes it easier to direct the water to the specific spots, making sure you water the roots without disturbing the soil and getting it all over your plants and pebbles.
  7. If you are keeping them in a spot with lots of sun lights, water them once a week.  If you are keeping them indoors with not much sunlight, you can get away with watering only once every fortnight.  Note that this will depend on the varieties you get and always make sure to read the labels attached to the containers.  You want to make sure that all of the water has been absorbed and that the soil is dry before you water them next. 
  8. You might also need to keep trimming your plants if they get too big for your containers.


Thursday, 10 September 2015

Bakso Bakwan Malang


This dish originated from the city town of Malang, hence the name.  

And what makes this dish different from other meatball-vermicelli soups (bakso bihun) is the variety of toppings that you get with it - the stuffed tofu, dim sums and fried wontons.  So good!

I personally have never been to Malang, but lucky for me, it is widely available in Jakarta.  You will find street food vendors pushing their carts around the neighbourhood or parked on the side of busy roads.

Sadly though, it is not that easy to find this in Sydney. 

So when i was craving for this a few weeks ago, i just had to make it!

Traditionally, you would make the beef balls from scratch.  But since there are many good brands available here, i just went and bought mine from the store.

Yes, it did take some time to make this but it is definitely worth it!


Bakso Bakwan Malang

Ingredients:

Beef Stock
  • 750 gr beef bones
  • 4 litres water
  • 15 beef balls
  • 16 garlic cloves, bashed
  • 4 eschallots, finely chopped
  • 5 tsp salt
  • 2 tsp pepper
  • 3 tbsp fish sauce (optional)
  • 2 tbsp soy sauce (optional)
Meat Filling
  • 400 gr chicken mince
  • 8 garlic cloves, finely chopped
  • 4 spring onions, finely chopped
  • 3 tbsp corn starch
  • 1.5 tsp salt
  • 1/2 tbsp sugar
  • 1/2 tsp pepper
Chilli Sauce
  • 2 big red chillies
  • 3 garlic cloves
  • 10 birds eye chillies
  • 1/2 tsp salt
  • 1 cup water
Toppings
  • Fried firm tofu, cut into 12 triangles
  • 40 wonton skins
  • 500 gr rice vermicelli
  • Oil for deep frying
  • 2 spring onion, finely chopped
  • Kecap manis, to taste
  • Fried eschallots
Methods:

Make your stock:
  1. Trim excess fat off your beef bone.
  2. Soak in boiling hot water for 15 minutes.  Then rinse under cold running water and set aside.
  3. In a big pot, sautee your garlic and eschallot until fragrant on medium high heat.
  4. Add in your beef bone and brown it on all sides.
  5. Add in your water and your seasoning. Turn up the heat to high and bring it up to a boil for 10 minutes.
  6. Then turn down the heat and simmer for 3 hours.  You can prepare the other toppings in the mean time.
  7. After 3 hours, adjust your seasoning to taste. 
  8. Make criss-cross cuts on the beef balls. Add them into your stock and bring it up to a boil for 10 minutes.

Make your meat filling:
  1. In a big bowl, combine all the ingredients for your meat filling and mix well.
Make your stuffed tofu:
  1. Carve out a small section on the longest side of your tofu triangles.
  2. Stuff each tofu with 1 teaspoon of the meat filling.  Make sure that you really press it in and smooth out the edges so that the filling does not fall off when steamed.
  3. Steam for 25 minutes.

Make your dim sums:
  1. Wrap 1 teaspoon of meat filling in each wonton skin, dabbing a bit of water to ensure the skin sticks on.
  2. Make 20 dim sums.
  3. Steam for 25 minutes.

Make your fried wontons:
  1. Take a 1/4 teaspoon of the meat filling and place it in one corner of the wonton skin.
  2. Dab a bit of water and fold the corner inward, enclosing the filling in a small triangle. 
  3. Make another fold inward, enclosing the filling once again.
  4. Dab a bit of water along your last fold.
  5. Take each side of the fold towards each other, then overlap them in the middle. Press to ensure they stick to each other.
  6. Make 20 wontons.
  7. Deep fry on medium heat until golden brown.  Make sure you keep flipping them around to have an even browning.
  8. Once done, drain on a plate lined with paper towels.

Make your chilli sauce:
  1. Place your chillies and garlic in a pot with a cup of water.  Bring it up to a boil for 10 minutes.
  2. After 10 minutes, drain the chillies and garlic, leaving 1/2 cup of the water in the pot.
  3. Grind the chillies and garlic in a food processor without any water into a paste. 
  4. Put your paste back into the pot along with 1/2 cup of water and cook for 5 minutes.

Prepare your rice vermicelli:
  1. Soak in cold water for 15 minutes. Drain and set aside.

Time to assemble:
  1. In a bowl, place your vermicelli.
  2. Add your stuffed tofu, dim sums and beef balls.
  3. Pour in your hot stock
  4. Add kecap manis to taste.
  5. Sprinkle with chopped spring onions and fried eschallots.
  6. Serve with chilli sauce on the side.

https://youtu.be/wId-0Y-9iEw


Thursday, 27 August 2015

Korean Seaweed Noodles Salad (CheonSaChae SaelReoDeu)


This seaweed noodles salad is a mayo-based salad that you would serve as a side dish to your meal.

The very first time i had it was at a Korean restaurant that we went to for my Sister's birthday dinner a few weeks back.  It was that interestingly, crunchy texture of the noodles that caught our attention and had us wanting for more!  We did not know what it was at first.  My Sister got really curious and was so eager to find out what that crunchy thing was, she even went up to ask the waiter.  But sadly he could not really explain what it was and all we got was.. 'may be something like seafood?'.

So after that night, i went on a quest to find out what this 'crunchy thing in my salad' was!  And more importantly, where to buy them so i can recreate the dish at home.  After looking high and low at my local Korean grocery stores to no avail, i took to the internet to shed some light!  And i finally found the (ONLY) recipe on http://aeriskitchen.com/. So if you are ever reading this, thank you so very much Aeri!

The crunchy textures of the noodles and carrots, the creaminess of the mayo-based dressing combined with the umami from the crab sticks make eating this salad such a pleasant experience.

Here is how to make it!

Adapted from http://aeriskitchen.com/


Ingredients (4 servings):
  • 340 grams Seaweed Jelly Noodles
  • 1 Carrot
  • 1 Cucumber
  • 3 Crab Sticks
  • 6 Tbsp Mayonnaise
  • 3 Tbsp Red Wine Vinegar
  • 3 Tbsp Sugar
  • 1 Tsp Salt
  • Pinch of pepper 

Method:
  1. Rinse and soak your noodles in cold water for 2 minutes.  After 2 minutes, drain really well and roughly chop them.
  2. Place your chopped noodles in a bowl, add 1 tablespoon of sugar, 1 tablespoon of red wine vinegar and 1/2 teaspoon of salt. Mix well and set aside for 20 minutes.
  3. Thinly slice your carrots, cucumber and crab sticks.  Remember to get rid most of the seeds from the cucumber to avoid watery salad later on.
  4. Prepare your dressing by mixing in a bowl 6 tablespoon mayonnaise, 2 tablespoon red wine vinegar, 2 tablespoon sugar, 1/2 teaspoon of salt and pepper to taste.
  5. After 20 minutes, drain your noodles really well.  Mix the noodles with your sliced carrot, cucumber and crab sticks. 
  6. Add your dressing and mix really well.
  7. Serve cold and enjoy!


Tuesday, 25 August 2015

Kue Nastar (Indonesian Pineapple Cookies)

Kue Nastar (Indonesian Pineapple Cookies)


These cookies are a must in every celebration in Indonesia! Chinese new year will not be complete without a jar of these wonderful buttery cookies, filled with sweet pineapple jam spiced with hints of cinnamon and cloves. Yum!


Ingredients:

Pineapple Jam Filling  (makes approx. 285 gr):

- 750 gr pineapple that has been peeled
- 125 g sugar, adjust depending how sweet your pineapple is.
- 0.5 tsp ground cloves
- 1.5 tsp ground cinnamon
- a pinch of salt

Note that this will make extra pineapple jam. You will only need 108 grams of filling for 36 cookies. The jam will keep in the fridge for a couple of weeks like any other jams.

Cookies (makes 36 cookies):

- 200 gr unsalted butter, softened
- 60 gr powdered sugar
- 280 gr all purpose flour
- 40 gr powdered milk
- 20 g cornflour
- a pinch of salt
- 2 egg yolks, room temperature

Egg wash:

- 1 egg yolk plus 1 tsp of heavy cream
- 2 egg yolks


Method:

Make your pineapple jam filling first, as it takes quite sometime and you need it cooled completely. I like to make mine the night before and refrigerate it overnight so it makes it easier to shape.

  1. Roughly chop your pineapple, blend well.
  2. Pour into a thick-bottomed pot with the sugar, spices and salt.Stir well and bring it up to a boil.
  3. Turn down the heat to low and cook for 2 hours, until reduced and caramelised. Stir it often to avoid the sugar in the mixture burning on the bottom of the pot.
  4. Cool down completely. Shape into 36 balls, weighing 3 grams each.


Make the cookie dough:

  1. Using a stand mixer/handheld mixer, beat softened butter and powdered sugar until light and well combined for about 5 minutes on medium speed.
  2. Add egg yolks, one at a time, beating well before adding in the second yolk.
  3. Add flour, powdered milk, corn flour and salt.
  4. Beat until well combined and forms a ball, roughly for 3 minutes.
  5. Shape into 36 balls, weighing roughly 18 grams each.


Shape your cookies:
  1. Preheat your oven to 150 degrees celcius (conventional oven) and line a baking tray with baking paper.
  2. Flatten a ball of dough.
  3. Place one pineapple filling ball in the middle. Enclose. Do not squash the filling.
  4. Shape it into a ball. You want a smooth surface with no cracks. Flatten the top and the bottom a litlte bit.
  5. Beat one egg yolk with a teaspoon of heavy cream. Brush tops of cookies with egg wash twice.
  6. Bake for 15 minutes.
  7. After 15 minutes, take the cookies out and brush them twice with two beaten egg yolks.
  8. Put the cookies back into the oven and bake for another 10 minutes. Make sure you turn the tray around so the cookies brown evenly.
  9. Cool completely and enjoy!


I personally think that the cookies taste better the next day, as the cookie dough is not as soft and has a nicer texture.

Store cookies in an airtight container, only after they are cooled completely.  They will keep for a couple of weeks at room temperature.


Monday, 24 August 2015

Hello!!


I have been contemplating about starting a blog for quite a while.

But then i was always hesitant, mainly because i did not know whether i would be able to keep at it - having to juggle between a full time 9 to 5 job and help my Significant Other run his business.

And finally, i just decided one day to actually start it!

So here is my first blog entry ever!

I love cooking and baking and anything food, so I knew that my blog would always be mainly about just that.

My motivation behind starting this blog is definitely not because i am good with words whatsoever.. But mainly because i would like to keep track of recipes that actually work for me and resulted in food that are suitable for the palates of my loved ones.

I also do hope that my kids in the future will be able to go to this blog and use it as their reference. Oh how i really wish my Grandmas, Dad and Aunties had kept some form of a recipe book that i could get my hands on!

I suppose that family 'recipe book' will have to start here :)

Lastly, I wanted this family recipe book to have pictures of some of the steps, as i know that it can be hard to follow a recipe without actually seeing it happen, which pinpoints the major issue with writing it all up with pen and paper - i am really bad at drawing! So, i figured a blog is the way to go!